
The ProtoTiger plugin is use to generate source code for the Apache Mina 2.x.x library.
Apache MINA is a network application framework which helps users develop high performance and high scalability network applications easily. It provides an abstract · event-driven · asynchronous API over various transports such as TCP/IP and UDP/IP via Java NIO.
Please read the documentation a the Apache Mina web site for more details.
This plugin currently helps with one of many aspects of the Apache Mina library and that is the generation of source code to use the ProtocolCodecFilter.
Read this page for an example of the ProtocolCodecFilter.
When I read the documentation on the ProtocolCodecFilter I thought it would help a lot of people, probably just me, if they could graphically design the client and serve packets. Generating the source code to handle the client and server packets using the ProtocolCodecFilter was a logical step from thier.
To create a ProtoTiger file right click on an existing Java project or create a new Java project. In the popup menu select New -> Other... -> ProtoTiger -> ProtoTiger file.
In the ProtoTiger wizard.
Use the Browse button to select which project to place the prototiger.pte file.
Click the Finish button when complete.
Double click the prototiger.pte file in the Package Explorer view to start the GUI editor.
The editor will appear.
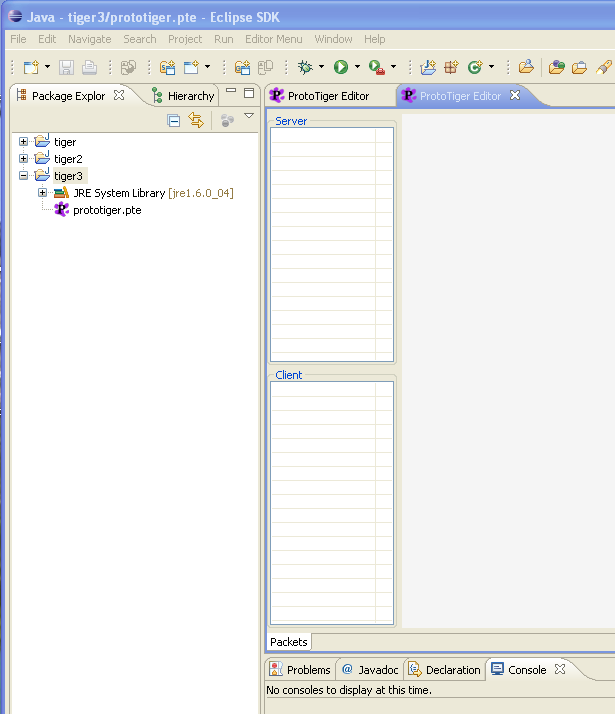
Right clicking in the grey area or the Server and Client lists will display popup menus.
Client and server packets are created by right clicking the grey area and selecting a Client or Server packet to create. Client packets are requests to the server and server packets are responses to the client request packet.
Normally, for each client packet you have a server packet but you can have multiple client packets using the same server packet. You can not have multiple server packets using the same client packet unless you hand code the logic into your code.
Once a client or server packet has been created you will see a empty packet on the grey area, right click this packet and select Edit Packet Data from the popup menu to add fields to the packet.
The packet editor appears.
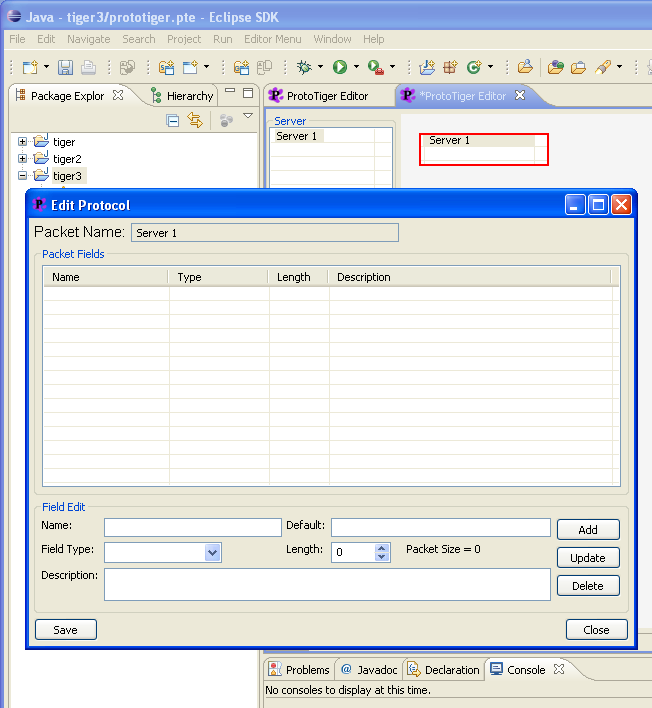
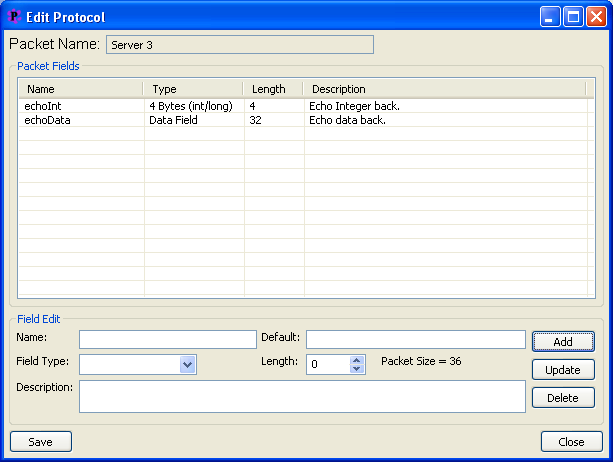
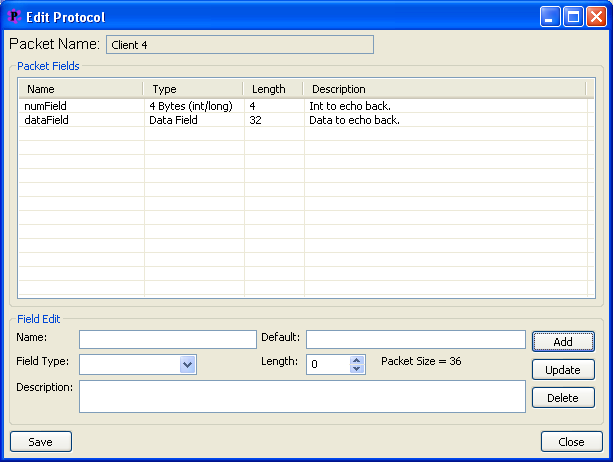
Add the following fields to the Server 1 packet.
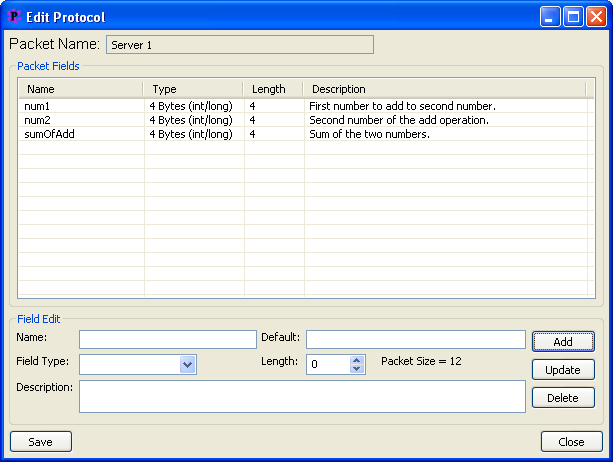
Click the Save button to save your data.
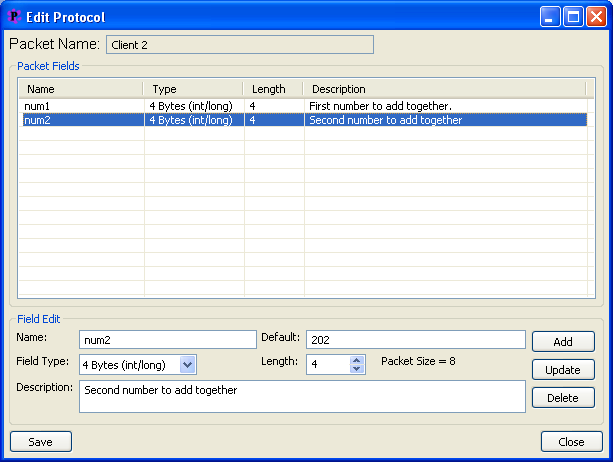
Next right click the grey area again and create a client packet and add the following fields.
Add the next two packets also.
and
Right click the grey area again and select Protocol Header from the popup menu and enter the following.
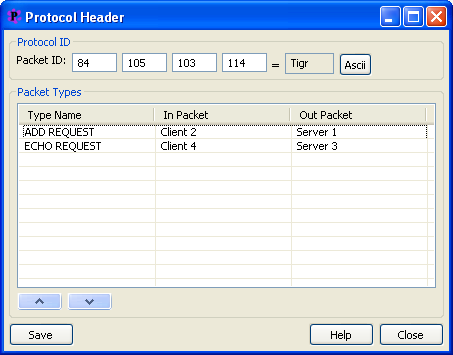
The Packet ID field is used to indentify all packets sent. You can select any 4 byte sequence for your Packet ID.
The Ascii button displays a ASCII code table, the fields use a decimal number.
To add a Packet Type right click the Packet Types table for a popup menu.
Once you have saved the Protocol Header you are ready to generate source code for your packets.
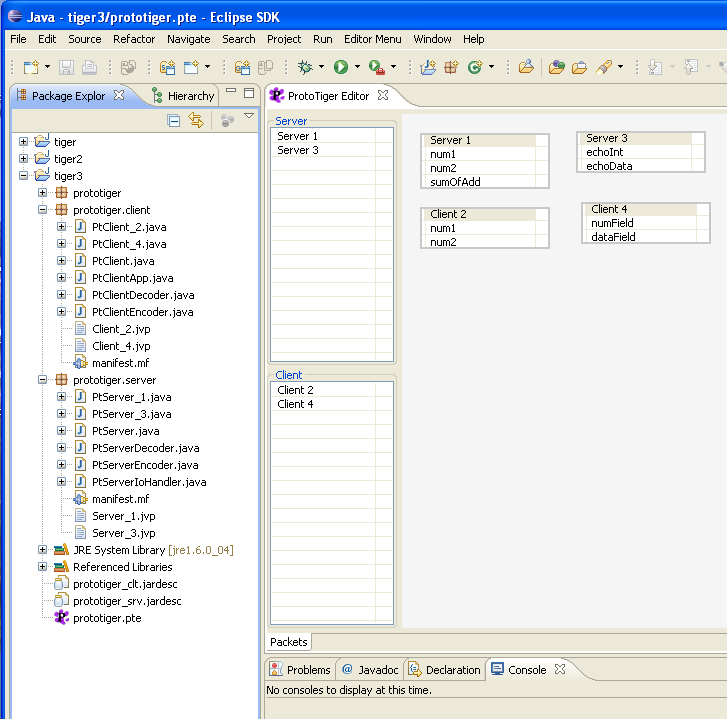
Right click on the prototiger.pte file and select ProtoTiger -> Generate Protocol from the menu.
This will create the following packages and files in the project.
The .jardesc files need to be modified to reflect your developement environment. Change the export destination to a directory on your system but outside of your project. Use the Open JAR Packager menu option when you right click the .jardesc file in the Package Explorer.
The files with the extention of .jvp contain java code fragments to be placed in the PtClientApp.java or PtServerIoHandler.java files. The name of each file is the name of the packet it goes with.
To generate these files you need to right click on a packet and select 'Edit Packet Code' menu option. What goes in each file is displayed below.

Generate the code again once you have the .jvp files defined.
The PtClientApp.java file is the starting point on the client side and were you need to modify the code for your protocol packets. The PtServerIoHandler.java file contains the server response code. Modify the code to convert client request packet into server response packet.
In the example above the client code, PtClientApp.java was changed to the following.
PtClient_2 ptClient_2 = new PtClient_2();
// TODO: fill the PtClient_2 packet with data.
ptClient_2.setNum1(101);
ptClient_2.setNum2(202);
sendRequest(ptClient_2); // Send to server.
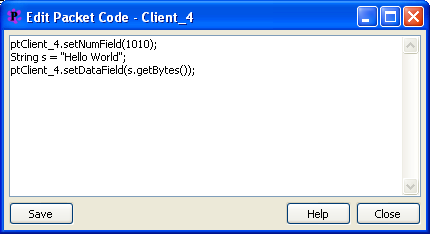
PtClient_4 ptClient_4 = new PtClient_4();
// TODO: fill the PtClient_4 packet with data.
ptClient_4.setNumField(1010);
String s = "Hello World";
ptClient_4.setDataField(s.getBytes());
sendRequest(ptClient_4); // Send to server.
The server code in the PtServerIoHandler.java is modified to the following.
if (message instanceof PtClient_2) {
PtClient_2 ptClient_2 = (PtClient_2)message;
System.out.println("ptClient_2.getPacketType: " + ptClient_2.getPacketType());
// TODO: Convert client request to server response here.
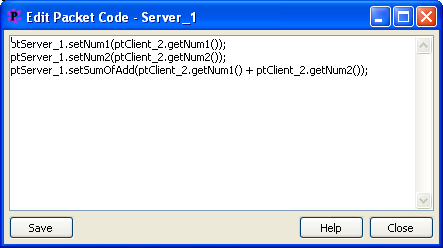
PtServer_1 ptServer_1 = new PtServer_1();
ptServer_1.setNum1(ptClient_2.getNum1());
ptServer_1.setNum2(ptClient_2.getNum2());
ptServer_1.setSumOfAdd(ptClient_2.getNum1() + ptClient_2.getNum2());
session.write(ptServer_1); // Send response back to client.}
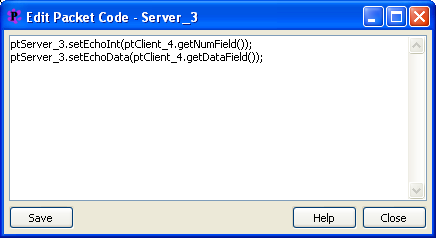
if (message instanceof PtClient_4) {
PtClient_4 ptClient_4 = (PtClient_4)message;
System.out.println("ptClient_4.getPacketType: " + ptClient_4.getPacketType());
// TODO: Convert client request to server response here.
PtServer_3 ptServer_3 = new PtServer_3();
ptServer_3.setEchoInt(ptClient_4.getNumField());
ptServer_3.setEchoData(ptClient_4.getDataField());
session.write(ptServer_3); // Send response back to client.
}
Now we need to generate the client and server jarfiles by right clicking on prototiger_clt.jardesc and prototiger_srv.jardesc files and selecting Create JAR from the popup menu.
The following files are needed to be placed in the same directory as the client and server jars.
If you use other supporting jar files then change the manifest.mf files to reflect the changes and regenerate the jar files.
This is how I release Java programs when I write applications for a contract. I find that having the jar files in the same directory as the application makes my life easier and they can be managed easier also.
The following command line is used to execute the application after I set my working directory to the location of the application.
java.exe -Djava.library.path=. -jar prototiger_srv.jar 2000
java.exe -Djava.library.path=. -jar prototiger_clt.jar ip_address 2000
Change ip_address to the address of the computer yout started the server on
I have put in debug statements into the code and will remove or hide them later in release 1.0.0
Thanks for trying ProtoTiger if you have any questions contact me at (rkwiles at verizon dot net)